

Introduction
Visit my YouTube channel
Please Check Video Before reading this post....the Video is in 2 parts....
Part-1 Of quad....
A Drone is a very expensive gadget(product) to buy. In this post I am going to discuss, how I make it at cheap?? And How can you make your own like this at cheap price…Well in India all the materials(motors, ESCs etc.) are very expensive(at least for me). So I decided to make it on, as cheapest as possible. The frame and the Flight Controller is DIY. The frame is made up of scraped aluminium antenna(bar), aluminium celling fan blade and Woods. Arduino UNO along with MPU6050(gyro+Accle) is used as a flight Contrller.
Step-1:-Materials Used
These are the materials Used for my Drone You can use any parts/materials as your requirement. If you want to make it as cheap as possible then you can go with the material list below.
1) 1000KV Brushless motor*4pcs
2) 30 Amp ESCs*4pcs
3) 1045 Propeller*4pcs
4) Arduino UNO + MPU6050
5) Perfboard (verroboard)
6) 1.5k,1k and 300E resistors and 1pcs LED. 7) Heat Shrink tube (I am using Electrical Insulation Tape)
8) Double Sided Tape, Soldering Iron, Soldering Wire etc.
9) A plastic Box (for Electronics)
10) 2200 mah or Higher li-po battery.(minimum 30C recommended)
11) Aluminium bar(hollow), Aluminium plate and Woods(soft).
Link of the all materials used in this project is given in the part-1 video Description.....


Step-2:-Motor mounting
When you bought the Motors the Motor mount and some screws comes with it. mount the aluminium motor mount using the screws comes with it. (see picture)


Step-3:-How to make a frame…
I am using old aluminium (yagi) antenna, Soft Wood, and aluminium plate(fan Blade) to make frame. Cut 4 pcs of aluminium bar each of 20cm. Centre plate Dimention is about 11*18cm….The wooden Motor mount is about 10cm long and Diameter of 4.5cm (where motor mounted). Fix the bars of aluminium with Center plate using screws( as your Requirement) and slide in the motor mount under the aluminium bars and……Here your frame is ready….(check Pictures) also a video of frame Work is on my Youtube Channel…..Check that out..


Step-3:-Mounting all things (ESCs and Motors to Frame)
Now mount the motors to it’s wooden motor mount using screws and Nuts (any types) and connect the ESC wire with it (Randomly) and fix the ESCs using Electrical tape or zip ties in my case it’s Electrical tape (it’s cheaper than Zip ties). After connecting all Motors and ESCs cut the +ve and –ve Wire of ESCs and connect all ESCs using Wires or PDB as your setup..I am Using Wires Because there is no space in my frame for ESCs…..And you’re Done…..
******Caution:-Remove all Props while setup…and Don’t Try to Fly Inside the Home….


Step-4:- Flight Controller
Make a Flight Controller using Arduino UNO and MPU6050…My flight controller is based on the Brokking’s YMFC-AL and it’s a Auto leveling Quad…make the connections as Diagram below……

Step-5:- Connecting the ESCs and receiver to FC
********Don’t Connect ESCs BEC wire(5 volt)…only connect signal wire****** ********And power the receiver using Arduino’s 5 volt supply*******
Now connect the signal wires of ESCs as Describe Below….also shown in the Diagram…
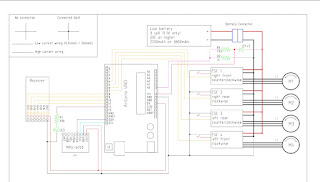
ESC connection…….
Digital pin-4 to ESC1 (Right Front CCW) Digital pin-5 to ESC2 (Right rear CW)
Digital pin-6 to ESC3 (Left rear CCW)
Digital pin-7 to ESC4 (Left front CW)
Receiver Connection….
Digital pin8 to Receiver Channel 1
Digital pin9 to Receiver Channel 2
Digital pin10 to Receiver Channel 3
Digital pin11 to Receiver Channe 4
Step6: Flight Controller Setup (Upload the Sketch)
******Don’t Connect the Flight Battery at This Time******
Now Download the Arduino Sketch below and extract the Zip file..you will find YMFC-AL schematic, Readme file, ESC calibration Code, Setup Code and Flight Controller Code…..
Visit my YouTube channel
Please Check Video Before reading this post....the Video is in 2 parts....
Part-1 Of quad....
Part-2 of quad.......
A Drone is a very expensive gadget(product) to buy. In this post I am going to discuss, how I make it at cheap?? And How can you make your own like this at cheap price…Well in India all the materials(motors, ESCs etc.) are very expensive(at least for me). So I decided to make it on, as cheapest as possible. The frame and the Flight Controller is DIY. The frame is made up of scraped aluminium antenna(bar), aluminium celling fan blade and Woods. Arduino UNO along with MPU6050(gyro+Accle) is used as a flight Contrller.
Step-1:-Materials Used
These are the materials Used for my Drone You can use any parts/materials as your requirement. If you want to make it as cheap as possible then you can go with the material list below.
1) 1000KV Brushless motor*4pcs
2) 30 Amp ESCs*4pcs
3) 1045 Propeller*4pcs
4) Arduino UNO + MPU6050
5) Perfboard (verroboard)
6) 1.5k,1k and 300E resistors and 1pcs LED. 7) Heat Shrink tube (I am using Electrical Insulation Tape)
8) Double Sided Tape, Soldering Iron, Soldering Wire etc.
9) A plastic Box (for Electronics)
10) 2200 mah or Higher li-po battery.(minimum 30C recommended)
11) Aluminium bar(hollow), Aluminium plate and Woods(soft).
***Link for India***
***For Out of India.......(Banggood)***
***Gearbest...***
Link of the all materials used in this project is given in the part-1 video Description.....


Step-2:-Motor mounting
When you bought the Motors the Motor mount and some screws comes with it. mount the aluminium motor mount using the screws comes with it. (see picture)


Step-3:-How to make a frame…
I am using old aluminium (yagi) antenna, Soft Wood, and aluminium plate(fan Blade) to make frame. Cut 4 pcs of aluminium bar each of 20cm. Centre plate Dimention is about 11*18cm….The wooden Motor mount is about 10cm long and Diameter of 4.5cm (where motor mounted). Fix the bars of aluminium with Center plate using screws( as your Requirement) and slide in the motor mount under the aluminium bars and……Here your frame is ready….(check Pictures) also a video of frame Work is on my Youtube Channel…..Check that out..


Step-3:-Mounting all things (ESCs and Motors to Frame)
Now mount the motors to it’s wooden motor mount using screws and Nuts (any types) and connect the ESC wire with it (Randomly) and fix the ESCs using Electrical tape or zip ties in my case it’s Electrical tape (it’s cheaper than Zip ties). After connecting all Motors and ESCs cut the +ve and –ve Wire of ESCs and connect all ESCs using Wires or PDB as your setup..I am Using Wires Because there is no space in my frame for ESCs…..And you’re Done…..
******Caution:-Remove all Props while setup…and Don’t Try to Fly Inside the Home….


Step-4:- Flight Controller
Make a Flight Controller using Arduino UNO and MPU6050…My flight controller is based on the Brokking’s YMFC-AL and it’s a Auto leveling Quad…make the connections as Diagram below……

Step-5:- Connecting the ESCs and receiver to FC
********Don’t Connect ESCs BEC wire(5 volt)…only connect signal wire****** ********And power the receiver using Arduino’s 5 volt supply*******

ESC connection…….
Digital pin-4 to ESC1 (Right Front CCW) Digital pin-5 to ESC2 (Right rear CW)
Digital pin-6 to ESC3 (Left rear CCW)
Digital pin-7 to ESC4 (Left front CW)
Receiver Connection….
Digital pin8 to Receiver Channel 1
Digital pin9 to Receiver Channel 2
Digital pin10 to Receiver Channel 3
Digital pin11 to Receiver Channe 4
******Don’t Connect the Flight Battery at This Time******
Now Download the Arduino Sketch below and extract the Zip file..you will find YMFC-AL schematic, Readme file, ESC calibration Code, Setup Code and Flight Controller Code…..